OpenPGP Part 6: Signing Git Commits
In this post we will cover how to sign your Git commits using the keys we generated previously.
Why Sign Your Commits?
It’s a little extra work and adds a small amount of size to each commit. So why do it? I’ll start with a story. A while back I noticed, in one of my private Github repos, the commits showed a user that was definitely not me. I had accidentally gotten the commit email wrong which happened to match the email of another user on Github. So Github, trying to be helpful, showed me that person’s avatar and name. 😲 By just looking at the UI you would assume that person had contributed to my repo.
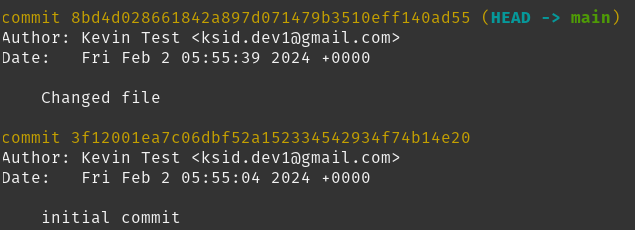
When you run git log on a repo to see who commited code it just shows a name and email as the Author.
 A typical git log output
That name and email are simply local git configuraion settings. Anyone can set their name and email to match yours and, ta-da, it looks like you were the one who commited the code. It’s a laughably easy exploit.
Signing code with your PGP key allows anyone to verify you were, indeed, the author. In a production environment this extends to the entire team. You can be certain about the origin of every commit (assuming the key has not been compromised of course).
 A signed commit
Setup
Before signing commits you must already have a key for signing. I personally use a separate subkey for signing Git commits as it provides a level of granularity and control. You may choose to use a single subkey for all your signing needs or even use the Primary Key although I recommend against this as signing is a private key operation so you would need your Primary Key private key present which introduces a security risk. It is recommended to keep your Primary Key offline.
With your keys created it’s really quite simple to configure Git for signing. First, we’ll need the ID of the key we want to use for signing. To get your key ID you can run
1
gpg --list-secret-keys --keyid-format=long
Note the 16 digit ID of your signing key and then enter the following commands.
1
2
git config --global gpg.program gpg2
git config --global user.signingkey [key ID]!
The first command tells Git which program to use for GPG and the second sets the signing key to use.
Don’t Forget the Exclamation Point: In the command above there is an exclamation point (!) after the key ID. This is needed if your signing key is a subkey. If it isn’t a subkey you can leave it off.
Pin Entry
Depending on your setup you may have a pin entry program installed which will prompt you for your passphrase when signing commits. If not, you can add the following line to your .bashrc file.
1
export GPG_TTY=$(tty)
This allows the signing process to prompt you for your signing key’s passphrase.
Signing Commits
To sign a commit you do everything you would normally do in your Git flow. The only difference is the commit command.
1
git commit -S -m "[message]"
The -S tells Git to sign the commit. You will be prompted for your passphrase. If the passphrase is correct your commit will be signed.
You can see commit signatures from the command line by running the following.
1
git log --show-signature
1
2
3
4
5
6
7
8
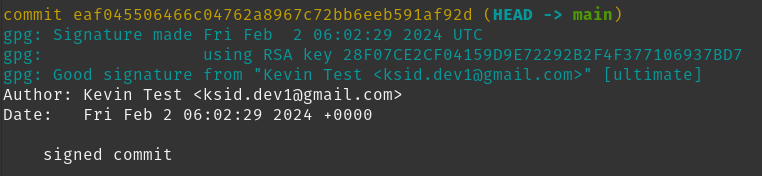
commit eaf045506466c04762a8967c72bb6eeb591af92d (HEAD -> main)
gpg: Signature made Fri Feb 2 06:02:29 2024 UTC
gpg: using RSA key 28F07CE2CF04159D9E72292B2F4F377106937BD7
gpg: Good signature from "Kevin Test <ksid.dev1@gmail.com>" [ultimate]
Author: Kevin Test <ksid.dev1@gmail.com>
Date: Fri Feb 2 06:02:29 2024 +0000
signed commit
Signed commits will have a header containing information about the signature.
If you want all of your commits to be signed by default without having to remember to add -S to the commit command you can configure Git to do so.
1
git config --global commit.gpgsign true
The
gpg-agentprocess will cache your passphrase for 10 minutes by default so you don’t have to enter it every time you commit. The cache timeout resets on every access of the passphrase from cache. If you want to adjust the timeout period you can use thedefault-cache-ttlsetting ingpg-agent1
Github Integration
Github has native support for signed commits and gives you some nice UI features as a result. The following is what signed commits will look like on Github when it doesn’t yet know about your signing key.
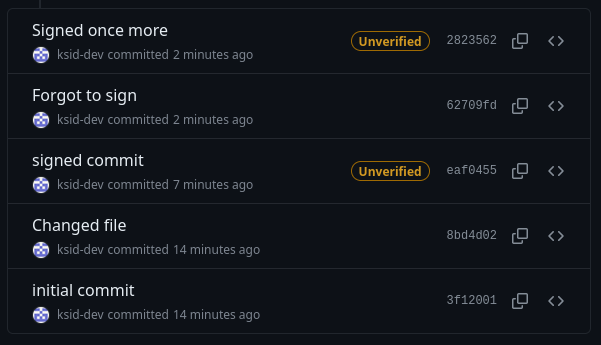 Signed commits before Github knows about the signing key
Notice the commits with signatures have “Unverified” next to them whereas commits without signatures have no indication. This is because Github can see the commits are signed but it has no way to validate the signatures or who they belong to. To fix this, you simply have to Add your GPG key to Github.
To get your public key run:
1
gpg --armor --export [key ID]
The output of this command is what you will need to configure the key on Github.
After doing so your commits will show up as “Verified”.
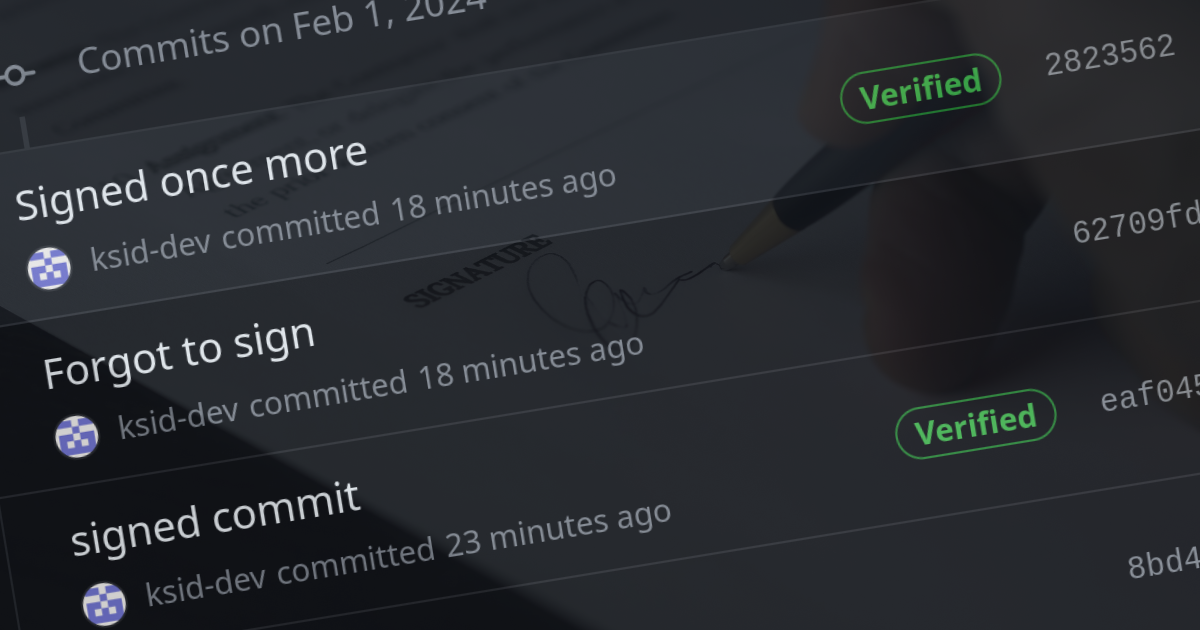
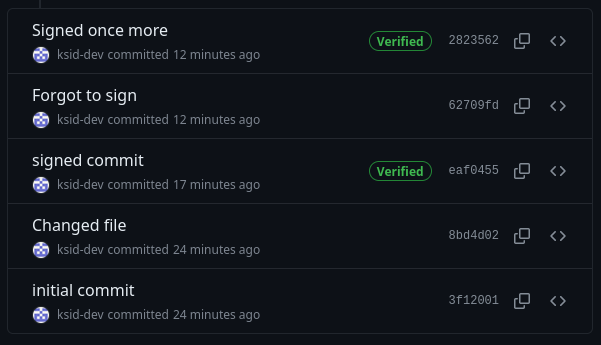 Signed and verified commits on Github
Production Pointers
- Sign all of your Git commits to create a verifiable audit trail of code changes
- Sign all of your Git tags (similar process to commits)
- Configure Git to sign commits by default so you don’t forget to do it
- Use a subkey for signing commits, never your Primary Key
Wrapping Up
Remember that signing Git commits is a private key operation so you need to have the private signing key available. This means it either needs to be on your local machine or accessible via a smart card like a Yubikey. Signing your Git commits ties into the Secure Pillar of Production. It helps protect your codebase from malicious actors and provides assurances as to who is contributing code. This is especially helpful when looking at the commit history as it provides a high level of confidence in the audit trail left behind.